Rated Excellent
Trusted by 1000’s of customersEarn Rewards
Get points with every purchaseExpert Advice
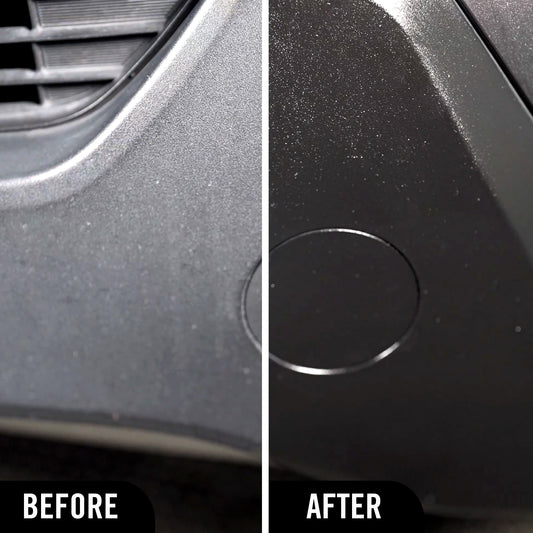
Professional tips for perfect detailingDon’t let faded trim ruin the appeal of your car. Turtle Wax Trim Restorer transforms dull trim, bumpers, window seals and cladding back to a fresh, like-new appearance in minutes. You can get fantastic results at home with just hand application, bringing back that deep black color and richness to your plastic trim. Our products also provide UV protection and weather resistance to keep your trim looking its best for longer.
-
Hybrid Solutions® Graphene Acrylic Trim Restorer, 10 fl oz
Regular price $12.00Sale price $12.00 Regular priceUnit price per

Why Car Trim Fades & Loses Color
All that black trim looked so sleek and fresh when you first got your car, but now it’s looking faded, chalky, and aging your whole vehicle. Unfortunately, it’s just what happens to plastic trim over time, caused by UV rays and accelerated by certain environmental factors.
Sunlight breaks down plastic over time, affecting the oils that keep the material flexible and the color dark and rich. With enough exposure, the depletion of oil can even lead to cracks developing in the plastic.
Living in an especially sunny state can make this more of a risk, though living in a cold or humid part of the country brings its own problems, too. Factors that affect the degradation of plastic include:
- Sunlight (UV radiation)
- High humidity
- Salt air (coastal areas)
- Road salt (colder states)
Bumpers, side mirror housing, door handles, window and side trims are all vulnerable to damage from these elements, whether that’s from daily sun exposure or living near a windy coastline. For vehicles parked outdoors in the Sun Belt, fading can start to happen from 6-12 months, while cars parked in a garage might develop fading after 2-3 years.
Tackling this problem is about preventative care and ongoing maintenance, hopefully avoiding the cost of replacement further down the line. DIY restoration can be done at home for $10-$20, while a detailing service can be anywhere from $75-$100. A replacement bumper might mean hundreds of dollars.
How Trim Restorers Actually Work
Trim restorer uses 4 mechanisms to tackle fading and brittle plastic, bringing it back to like-new condition and protecting it against future damage.
- Mechanism 1: Pigment in the restorer penetrates the porous surface of the plastic, filling in color where the original has depleted.
- Mechanism 2: Conditioning oils (polymers) replace plasticizers lost through UV exposure, restoring flexibility and reducing brittleness.
- Mechanism 3: UV inhibitors create a protective shield against sun damage, blocking UV rays that could cause future fading.
- Mechanism 4: In-built sealant creates a hydrophobic barrier against moisture from rain and other contaminants.
Trim restorer will immediately restore the look of plastic trim, but it needs ongoing application to maintain a protective barrier against future fading.
Standard trim restorer products can last from 4-8 weeks, while advanced ceramic or graphene formulas, such as our Hybrid SolutionsⓇ Graphene Acrylic Trim Restorer, can provide 3-6 months of protection.
Reapplication helps to build deeper color restoration over time as the plastic absorbs the oils. It also helps to keep up the UV and anti-moisture protective barriers.
Exterior vs Interior Trim Restoration
Exterior Trim
Challenges:
- UV rays
- Exposure to harsh weather
- Road contaminants (salt, tar, brake dust)
Goals:
- Restore deep black color
- Matte finish
- Moisture-resistant barrier
Main problem areas:
- Bumpers
- Mirror housing
- Door handles
- Window trim
- Rocker panels
- Grille surrounds
Interior Trim
Challenges:
- UV rays on the dashboard
- Hand oils and finger marks
- Residue from cleaning products
- Splashes and spills from food
Goals:
- Color restoration
- Matte, non-greasy finish
- Reduce risk of cracking
- Subtle, elegant result
Main problem areas
- Steering wheel
- Door handles
- Console controls/buttons
- Dashboard surface
When choosing the right product to tackle each problem, many will work on both the interior and exterior of your car. However, always check the product carefully to see what it’s designed for. Exterior trim restorers will focus on factors like UV protection, while interior detailers will provide cleaning and an even finish.
Common Trim Problem Areas
- Bumpers: Front and rear bumpers are often the largest areas of trim, attracting the most UV radiation as well as damage from stone chips bouncing off the road. Because of this, they can have the most impact on the look of a vehicle, making it an important area for trim restoration.
- Side mirrors: Their more exposed position on the side of the car means side mirrors catch a lot of sun, as well as being exposed to bad weather while driving. This makes them one of the first areas to fade, but they’re also quick and easy to restore.
- Door handles: Lots of hand contact means lots of oils transferring to the door handle’s surface, as well as more wear and tear. Removing fingerprints and adding more protection can make a big improvement in appearance immediately and over time.
- Rocker panel: Their low position on the vehicle means the rocker panels catch a lot of dust and dirt from the road, adding to their wear and tear. Keeping the surface protected can help reduce the impact of moisture and dirt on its appearance.
- Window trim: Rubber or plastic seals can develop a white chalky bloom over time, which not only affects the appearance of the vehicle but can also compromise their integrity.
- Grille surrounds: Radiator grilles are exposed to heat from within as well as bearing the brunt of the road conditions when driving. This makes them very susceptible to fading and surface damage, so they need extra care to keep looking good.
- Pillar covers: Pillars with plastic trim or covers are another large area that’s very visible every time you use your vehicle. Faded trim here will have a big impact on the overall look, so it’s a key area for restoration and protection.
How to Apply Trim Restorer for Best Results
- Preparation: A vital step is washing your vehicle and cleaning the trim before you start any restoration work. Clean the trim with an all-purpose cleaner or specific trim preparation product to remove any previous buildup.
- Surface readiness: Make sure the area is completely dry and cool before moving on. Always avoid doing detailing and other maintenance on your vehicle in direct sunlight, as this can affect how products work. Work in a garage or in a shaded area.
- Masking: This is optional, but it can be safer to mask off adjacent paintwork or other surfaces to avoid the risk of product transfer.
- Application amount: A small amount of product goes a long way, so start with a few drops on your applicator or microfiber cloth. You can always add more if needed, but using too much can leave a greasy finish that’s hard to buff out.
- Technique: Apply in a thin, even coat across the area you’re working on, working in circular motion with light pressure. Make sure you’re thoroughly working in the product over textured areas, but also watch out for getting too much product in any crevices.
- Drying time: Allow 5-10 minutes for the product to dry after application, making sure not to touch it. If the instructions direct, you may need another coat once the first is dry to the touch. A full cure may take 2-6 hours, depending on the product, during which the vehicle should be kept dry.
- Frequency: With more severely faded trim, another application after 24 hours might be necessary. How often you reapply after this will depend on the product, ranging from a few weeks to several months.
Check out our how-to guide on cleaning plastic trim for more detailed information and guided steps.
Protecting Trim From Future Fading
Once you’ve restored your trim to its former glory, you’ll want to keep it that way for as long as possible. We’ve got a few hints and tips on how to protect your trim from fading.
Regular washing is important for removing anything that could corrode your plastic trims, from road salt to bird droppings, so make sure to keep them clean.
When parking at home, a garage is ideal for protecting your vehicle from UV rays as well as the weather. A covered carport will also help to reduce exposure to UV light.
Reapplying trim restorer regularly will help to keep the plastic conditioned and protected, so set yourself calendar reminders according to the product you’re using. Addressing signs of fading early is also much easier to deal with compared to severely degraded trim. Leaving plastic to degrade to the point of cracking means much more work and expense to deal with.
You could spend $50 on trim detailing products over the course of a year, but compare that with spending hundreds or even thousands of dollars to replace bumpers or panels over a vehicle’s lifetime.
Choosing the Right Trim Restorer
Style of finish - Are you looking for a subtle, matte finish, or do you want something with a bit of shine and polish? Some products offer different results when it comes to the look, so go for something that matches your taste.
Damage level - If your trim has only light fading, a standard restorer should do the job. For moderate to heavy fading, multiple coats might be necessary. If the plastic is more severely damaged with cracks, then a replacement might be the only option.
Application type - There may be options for different application techniques, such as quick and easy spray vs a wipe-on liquid. In general, a liquid that you apply with a cloth will give you the most precise control, with less risk of missing the targeted area or using too much product.
Long-term protection - Standard trim restorer products may present the most affordable option, but they may not provide any ongoing protection after applying. More advanced products should include protection from UV radiation and the weather.
Interior vs exterior trim - A key area of difference is whether you’re cleaning your interior or exterior trim. Our Hybrid SolutionsⓇ Graphene Acrylic Trim Restorer is ideal for restoring and protecting exterior trim with UV and weather protection included. For interior trim and dashboard restoration, Hybrid SolutionsⓇ Streak-Free MistⓇ Interior Detailer would work best.
Trim Restoration FAQs
How long does trim restorer last on cars?
A standard polymer-based trim restoration product lasts from 4-8 weeks, depending on the weather and if the vehicle is parked in a garage or outside. More advanced products with graphene or ceramic formulations might last 3-6 months or more. Reapplying over time will help to build up the conditioning oils, increasing longevity and protection.
Is trim restorer the same as tire shine?
While some products will work across tires and trim, there are some differences. Tire shine products are designed to resist the centrifugal force that would otherwise fling the product off when they spin. Trim restorer products will tend to provide a matte finish, while tire shine is naturally shiny. Also, check the product label to see suitability for multiple types of application.
Can I use trim restorer on my dashboard?
This depends on the product, as exterior trim restorers generally provide a different finish to interior detailing products. Interior detailing products are designed to provide a non-greasy matte finish, reducing glare off the dashboard and avoiding residue on high-touch areas like the steering wheel.
Will trim restorer damage my car’s paint?
Good quality trim restorer products will be paint-safe in case any gets on the vehicle’s paintwork, but it’s always best to immediately wipe it off if transfer does happen. Masking off adjoining areas can be a good option to avoid the risk altogether.
What’s the difference between trim restorer and trim dressing?
Trim restorer contains pigment designed to restore lost color to faded plastic trim, as well as providing UV and weather protection. Trim dressing helps to enhance existing color, adding shine for everyday maintenance rather than restoring faded surfaces.
Faded trim needs restoring before it can be maintained with trim dressing.
Can trim restorer fix cracks in plastic?
Trim restorers can’t fix physical cracks in plastic trims or restore severe brittleness. Structural damage to the trim is permanent and can only be repaired with a replacement. Trim restorer can help avoid this while the trim is still undamaged, restoring the color and condition and adding long-term protection.
Do I need to remove old trim restorer before reapplying?
When using a high-quality product, trim restorer can build protective layers over time, absorbing and bonding with previous applications. The exception is when older products have built up an uneven layer or have left a greasy feel. In this case, it’s best to start from scratch and use an all-purpose cleaner to remove the old product.
How do I restore trim that’s severely faded or chalky?
Using a trim restorer for the first time on a severely faded area might not result in a perfect finish. In this case, you simply apply a second coat after the first has dried, and allow it to cure for several hours. If there is a heavy build-up of chalky residue, you could also use a light abrasive pad to remove some of this before using the restorer.
Will trim restorer make my trim shiny or leave it matte?
This will vary by product, but most trim restorers will go for a satin or semi-gloss finish, aiming for a factory-fresh look. The first application may look a little glossier, though it will usually settle to a more natural finish after curing.
Can I apply trim restorer in direct sunlight?
It’s not recommended to apply trim restorer - or any car product - in direct sunlight. UV rays interfere with the bonding and curing processes. The added heat can also cause the product to dry too quickly while you’re applying, leaving streaks or an uneven finish. It’s always best practice to work in a garage or park in the shade when applying trim restorer.
How do I prevent trim restorer from looking greasy?
Trim restorer can sometimes end up looking greasy if too much product has been used, or it hasn’t been given enough time to dry. You only need a thin layer when applying, so don’t use too much at once. The finish may look glossier immediately after applying, but it will become more matte as it cures.
Does trim restorer protect against future fading?
Yes, a good quality trim restorer will include long-term protection as part of its formula, providing a barrier against UV rays and the weather. This protection will need upkeep with reapplication every so often, from a few weeks to several months, depending on the product.
Get that factory-fresh black trim at home with our DIY products and our expert trim restoration techniques. For more tips, troubleshooting and application guides, check out our How-To section, and get those professional results at home with our guide on how to restore dull car trims.